Feeds:
Posts
Comments

Archive for July, 2009

I don’t even know if I have done a masculine card before? Pink is my comfort zone lol. This is also another sneak peek of stamp set from the new Spring Mini catalogue. The set is called ‘Sense of Time’, it includes this large clock, a smaller cog set and 2 sentiments. I have also used some of the new Jumbo Brads in silver. And I almost forgot, I have used patterned cardstock from the new Parisian Breeze pack. I cant wait to use this cardstock on more projects, its SO nice.

I’ve inked the clock slightly, to give it a distressed/old look about it. Don’t know if I’ve achieved that look, but its there anyway lol. I’ve also punched out the inner section of the clock to give the card more dimension.

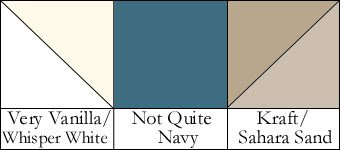
The colours from this card are inspired by this months Elite Colour Challenge
You can see all the cards using this colour scheme HERE
Just remember that you can contact me for a free copy of the Spring Mini Catalogue.

Supplies:
Cardstock:
Kraft, Not Quite Navy, Parisian Breeze DSP
Ink: Versamark, Not Quite Navy, Sahara Sand
Stamp Set: Sense of Time, Weathered
Other: Kraft Taffeta Ribbon, Jumbo Brads-Silver, Corner Rounder

Read Full Post »

Here’s another card for Christmas In July. Thought I would have a go at reverse masking and love how this card turned out. And better yet, it’s simple and quick to make. Again I have used my favourite Christmas set, Season Of Joy, I just can’t get enough of it.

Here’s a close up of the ‘Christmas decoration’

Stay tuned for tomorrow’s post, as there will be another sneak peek from the new Spring Mini Catalogue
ENJOY!

Supplies:
Cardstock: Whisper White, Ruby Red, Kraft
Ink: Ruby Red, Versamark
Stamp Set: Season Of Joy, Many Merry Messages
Other: White Gel Pen, Kraft Taffeta Ribbon, Corner Rounder,

Read Full Post »

I’ve been a bit slack with my blog updates over the 2 weeks hopefully I can get back to more regular posts during the week.

I wanted to show the 6 In-Colours Stampin Up has to offer during the 2009-2010 Catalogue and what better way than to create a set. So up in the top left-right we have Baja Breeze, Pink Pirouette, and Kiwi Kiss and the bottom row left to right we have Tangerine Tango, Riding Hood Red, and Pacific Point.

Now for those who are wondering what set that butterfly and phrase comes from, its not from the current catalogue. BUT, it does come from the new Mini Catalogue that starts on August 1st! Yes, there is a new Mini Catalogue and its filled with some great new stamps, patterned paper and accessories. If you would like to get your hands on a copy (FREE of course) please EMAIL ME you details and I will pop one in the mail for you during the week.
Also, keep you eye out during the week as I have a pocket for theses cards to go in.
ENJOY!
Supplies:
Cardstock: Whisper White, Baja Breeze, Pink Pirouette, Kiwi Kiss, Tangerine Tango, Riding Hood Red, and Pacific Point.
Ink: Whisper White, Baja Breeze, Pink Pirouette, Kiwi Kiss, Tangerine Tango, Riding Hood Red, and Pacific Point.
Stamp Set: Baroque Motifs, Great Friend
Other: Sponge Daubers

Read Full Post »

Yesterday I was asked by one of my lovely customers (Hi Bernie) how I made the bow on THIS CARD. So Bernie, this is how:

1. Cut a piece of ribbon. This one is about 12cm (4 -3/4″) long.

2. Next you need to add a little bit of adhesive to one end. I am using Glue Dots (Available from Stampin Up).

3. Next you need to join the ends together to make a complete circle.
4. Now take another piece of ribbon, this one is about 6cm (2- 1/2″). Stick the 2nd piece of ribbon on the middle of the join. I’ve used another Glue Dot for this.

5. Then you need to start wrapping it around to the other side (which will become the front)

6. Then on the back have another Glue Dot, or more adhesive to stick the other end to. (you could also do this at step 4)

7. Then chop off the excess and you’re done!

This is what the front looks like


and this is the back, that you would stick to your card/scrapbook page/project.

You can get as creative as you like, use 2 different colour ribbons, add a pearl or rhinestone to the centre, use 2 layers insted of 1. Let your imagination go wild!
ENJOY!

Read Full Post »

I need some one else’s eyes on this one. As usual, the card I had in my head, turned out totally different than the one I made lol. I wanted to use this stamp from the ‘Inspired By Nature’ set, and wanted to highlight just one section of it in colour. See picture number 1. My problem is, I don’t know if it suits the style card i have made? I haven’t stuck the coloured circle down yet. It was originally supposed to be on the flower on the right hand side, but decided I liked it on the left.
I know it does look a little blank, like something is missing without it. I also couldn’t decide where to put a greeting/sentiment, so I have put one in the inside. My main problem of having a greeting on the front, was that I couldn’t keep a overall balanced look.
Some of the finer details you might have missed, I’ve clear embossed the background in the En Francis background stamp and then used the Pastels to distress the edges. I’ve also used the Kraft taffeta ribbon on top of the Grosgrain ribbon.

So leave me your comments and let me know what you think.
ENJOY!

Supplies:
Cardstock: Regal Rose, Rose Red, Whisper White, Sahara Sand
Ink: Regal Rose, Rose Red, Handsome Hunter, Sahara Sand, Versamark
Stamp Set: Inspired By Nature, En Francis
Other: 1 1/4″ Circle Punch, 1 3/8″ Circle Punch, Eyelet Border Punch, Regal Rose Grosgrain Ribbon, Kraft Taffeta Ribbon, Stampin Pastels, Clear embossing Powder, Sponge Daubers

Read Full Post »

For those of you that celebrate Christmas in July, this card is for you. Just a regular looking card right? Well, let me pull the green tab at the top for you and lets see what happens…….
TA DA! Just a nice little twist on a regular card. I have use clear embossed the Merry Christmas greeting, which really gives it a nice touch.

I’ve used my new favourite tool, the sponge daubers to ink the edges of the card, to give it a distressed look. I’ve used the same colour ink as the card, but you could also use the Stampin Pastels, if you wanted a softer look. Then again, you could use a brown or black to go for the really distressed look.
This stamp set is another I absolutely love because of its versatility. You can achieve so may different looks with it. I will be making some more Christmas cards this month, so keep you eye out for this set.

EJNOY!

Supplies:
Cardstock: Old Olive, Riding Hood Red, Kraft, Very Vanilla
Ink: Old Olive, Riding Hood Red, Versamark
Stamp Set: Season of Joy
Ribbon: 1″ Grosgrain Very Vanilla, Riding Hood Red Taffeta
Other: Haiku DSP, Round Tab punch, 1/2″ Circle Punch, Clear Embossing Powder, Sponge Daubers, Clear Rhinestone Brad

Read Full Post »

I ran out of time to complete the challenges over at the Elite Challenge Blog last month, but I’ m back with a card for the July Sketch Challenge. It is based on the card found on page 31 of the Australian/NZ 2009-2010 Catalogue. You should never run out of ideas with the Idea Book and Cataloge handy. This is the sketch
and this is the card I created.
It’s just so hard to capture the sparkliness of the SuperNova Fine glitter. You can see it a little better in the photo below, but if you would like to see it up close and personal, I’d be happy to show you.
I have used a chipboard Pear from the On Board So Tweet pack, covered it with TomBow glue and just sprinkled it with the glitter. So easy, and very sparkly!
I have to thank my friend Petra, who sent me a few goodies, which helped me put this card together so easily.

Supplies:
Cardstock: Chocolate Chip, Kiwi Kiss
Ink: Kiwi Kiss, Chocolate Chip, Summer Sun
Stamp Set: One of a Kind
Ribbon: 1″ Grosgrain Chocolate Chip Ribbon, Kiwi Kiss Satin ribbon
Other: Good Morning Sunshine DSP, 1-3/8″ Square punch, 1-1/4″ square punch, Word Window Punch, SuperNova Glitter, TomBow Adhesive, dimensionals,

Read Full Post »

As much as I would love for everyone to be able check my blog daily, I know life gets busy. But it’s as easy as ever to be notified when I post new content. There are 3 easy ways to be notified

1. Enter you email address in the blog notification field (at the top of the side bar). Every time I update my blog, a notification will be sent to the email address you entered.

2. Become a follower of my blog. This is also located toward the bottom of the side bar This is great if you already have a blog, or you have google account. When I update content, it will appear in your readig list of blogs you follow.

3. Not quite finding what I’m talking about? Send me an email and I will add you to the blog update list manually.

I’m always open for suggestions for blog content. Is there a product you would liked reviewed, or used? Have a particular technique you would like to see in action? Send me an email with your ideas.

You can also sign up for my newsletter on the right hand side. It features product reviews, upcoming events, classes, promotions and lots of other content. Be in the know, and recieve my newsletter!

Read Full Post »

Design a site like this with WordPress.com
Get started