Being St
Patricks day today, a bit of luck is coming your way! You will be lucky to be getting 2 post’s and 3 tutorials! How did that happen? Well…..My plan this week was to show you tutorials for ‘not your ordinary fold’ cards, when I got the news I am now allowed to show you some sneak peeks from the new catalogue! So, not to
disappoint, I will show you this sneak peek this morning, which includes a tutorial, and later this afternoon I will share the tutorial for my St. Patrick’s Day Card. Talk about sending me into a frenzy!
This is the card I made, 
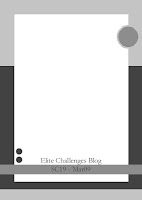
And this is the sketch It came from. this is from the Elite Challenges Blog and can find this months designs HERE
 The new stamp set I am using is called ‘Good Friend’. I have used 3 of the 6 new In colours, Kiwi Kiss, Tangerine Tango and Riding Hood Red. The patterned paper is from the ‘Good Morning Sunshine Designer Series’ paper, and lastly I am using the new ‘Flower Designer’ brads
Now, the tutorial I want to share with you is ‘How to use a Stamp-A-ma-jig‘. Some of you might be asking, What is a Stamp-a-ma-jig’, are you just making up names lol? The Stamp-a-magic helps to get your stamped images straight and EXACTLY where you want them. It’s great for alphabets stamps, 2 step stamping technique, or any stamp really. The Stamp-a-majig comes with the Black Corner tool and an imaging sheet. It’s’ a thick clear plastic This is what we will need for the tutorial
Stamp-a-ma-jig, Good Friend stamp set, Kiwi Kiss, Tangerine Tango and Riding Hod Red Ink, and Whisper White Cardstock.
I’m using the bird body, the beak and the legs from the stamp set. Ink the bird body with Tangerine Tango ink
 and stamp it on Whisper White cardstock.

Grab the imaging sheet and place it right into the corner of the Stamp-a-ma-jig. You can use either side, its made for left and right handed crafters.

Now ink up the leg with Kiwi Kiss Ink and butt the stamp into the corner of the Stamp-a-ma-jig

and press the stamp onto the imaging sheet. Its a simple step but the most important.


It’s a bit hard to see on the photo, but place the imaging sheet with your stamped image exactly where you want it
Then bring the stamp-a-ma-jig and butt it back into the corner of the imaging sheet. When you have it where you want it, move the imaging sheet
Ink the leg in Kiwi Kiss again and butt the stamp into the corner of the stamp-a-ma-jig and stamp the leg.
Move the stamp, and Presto! You have a leg for your birdie.
 Do the same thing again for the second leg (unless you want your birdie to have 1 leg)

An then the little
birdie should have 2 perfectly positioned legs!

Then
grab a baby wipe, a tea towel, or you could use your
Stampin Scrub to clean off the imaging sheet. Because its a slick plastic, it comes off without and troubles.

Now do the exact same steps for the beak. Stamp the image on the imaging sheet.


Position the imaging sheet where you want the
beak to be stamped

Put the stamp-a-
ma-jig back
in line with the corner of the imaging sheet and stamp the image in the corner of the
stamp-a-
ma-jig.

and look at that, a perfect
beak!


Now here is one where I
didn’t use the stamp-a-
ma-jig. Can you see how it overlaps?

And
another example, the leg on the right, I was able to get it pretty close to the body with out overlapping, but the left leg was a bit out

Stay tuned for another tutorial later today and for more sneak peeks during the week!
 You pull each corner outwards
 keep pulling….
 and it fold out to be a flat card
  Very easy, very quick, and a little different than your normal card.


